

Recently, I had the opportunity to help a client not only migrate their Kubernetes clusters to AWS EKS but also set up an EKS cluster with a Windows node. Turns out, it wasn’t as straightforward as I initially thought.
So, I want to share the steps and challenges I faced so you can set up your own Windows nodes in your EKS cluster without the same headaches! 😉
For this guide, I’ll be using HashiCorp Terraform to deploy the EKS cluster and kubectl with k9s to manage it.
Enable Windows Support on EKS
Before installing the EKS cluster, we need to meet some prerequisites to ensure Windows nodes work properly. You can find the full list of requirements in the AWS documentation.
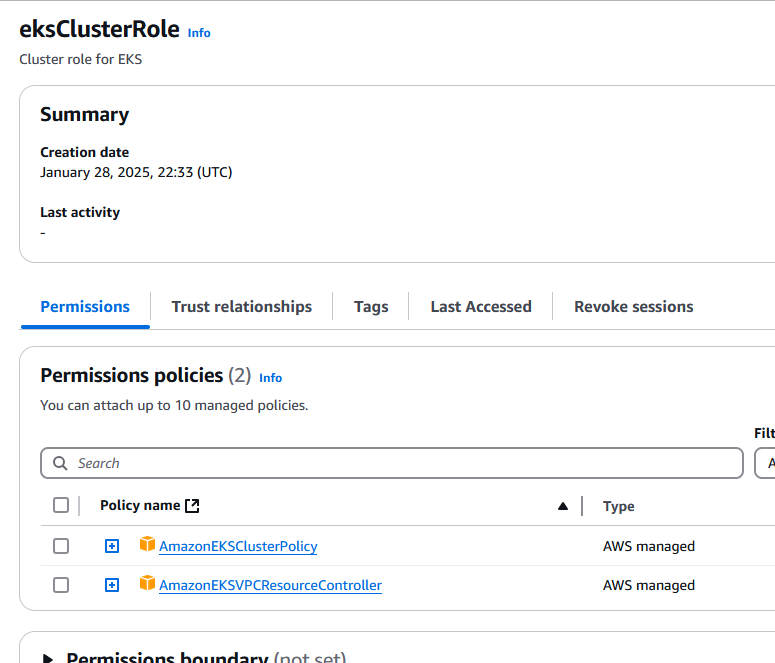
First, let’s create an IAM role with the following AWS-managed policies:
Setting Up the EKS Cluster
Step 1: Initialize Terraform
The first step is setting up our Terraform environment.
- Create a folder to store the Terraform files, and name it something like
EKS. - Add your Terraform configuration files, such as:
provider.tf(to define providers)_version.tf(to specify required versions)
provider.tf
provider "aws" {
  region  = "eu-west-1"
  profile = "default"
}
_version.tf
terraform {
  required_version = ">= 1.7.2"

  required_providers {
    aws = {
      source  = "hashicorp/aws"
      version = ">= 5.34"
    }
  }
}
Step 2: Fetch VPC and Subnet IDs
For the EKS cluster, we need VPC and subnet IDs. Since I already created them in the AWS console, let’s fetch them using a Terraform data resource:
data.tf file:
data "aws_vpc" "vpc" {
  id = "vpc-11111111111111111"
}

data "aws_subnet" "sub1" {
  id = "subnet-aaaaaaaaaaaaaaaa"
}

data "aws_subnet" "sub2" {
  id = "subnet-bbbbbbbbbbbbbbbb"
}

data "aws_subnet" "sub3" {
  id = "subnet-cccccccccccccccc"
}
Step 3: Deploy the EKS Cluster
Now, let’s configure the cluster using the EKS Terraform module.
eks.tf file:
module "eks" {
source = "terraform-aws-modules/eks/aws"
version = "20.33.1"
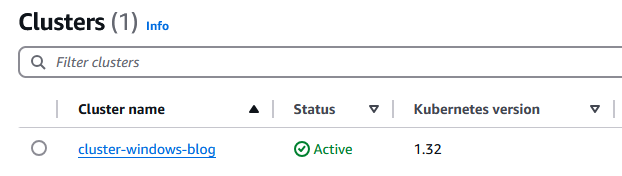
cluster_name = "cluster-windows-blog"
cluster_version = "1.32"
cluster_addons = {
coredns = {
addon_version = "v1.11.4-eksbuild.2"
}
kube-proxy = {
addon_version = "v1.31.3-eksbuild.2"
}
vpc-cni = {
addon_version = "v1.19.2-eksbuild.1"
}
eks-pod-identity-agent = {
addon_version = "v1.3.4-eksbuild.1"
}
}
vpc_id = data.aws_vpc.vpc.id
subnet_ids = [
data.aws_subnet.sub1.id,
data.aws_subnet.sub2.id,
data.aws_subnet.sub3.id
]
cluster_endpoint_public_access = true
cluster_endpoint_public_access_cidrs = ["YOUR_IP/32"]
# EKS Managed Node Group(s)
eks_managed_node_group_defaults = {
iam_role_additional_policies = {
AmazonSSMManagedInstanceCore = "arn:aws:iam::aws:policy/AmazonSSMManagedInstanceCore",
AmazonEC2ContainerRegistryReadOnly = "arn:aws:iam::aws:policy/AmazonEC2ContainerRegistryReadOnly"
}
}
eks_managed_node_groups = {
unix = {
name = "k8s-unix-node"
min_size = 1
max_size = 2
desired_size = 1
instance_types = ["t3a.xlarge", "t3a.2xlarge"]
capacity_type = "SPOT"
labels = {
lifecycle = "spot"
}
},
windows = {
name = "k8s-windows-node"
min_size = 1
max_size = 2
desired_size = 1
instance_types = ["t3a.xlarge", "t3a.2xlarge"]
capacity_type = "ON_DEMAND"
ami_type = "WINDOWS_FULL_2022_x86_64"
}
}
# Cluster access entry
# To add the current caller identity as an administrator
enable_cluster_creator_admin_permissions = true
authentication_mode = "API"
}
If you look at the configuration, you’ll notice we have two nodes:
- A Linux node
- A Windows node
This is because certain core services in the cluster—like CoreDNS—must run on Linux nodes.
Let’s apply the configuration and move to the next step!

Configuring the EKS Cluster
Now, we need to set up the ConfigMap to:
✅ Add the eks:kube-proxy-windows RBAC permission group
✅ Enable the VPC resource controller to assign IPs to pods
Step 1: Connect to the Cluster
Ensure you’re connected to the newly created cluster:
aws eks update-kubeconfig --region region-code --name my-cluster
Step 2: Configure the aws-auth ConfigMap
Download the authentication ConfigMap file from AWS:
curl -O https://s3.us-west-2.amazonaws.com/amazon-eks/cloudformation/2020-10-29/aws-auth-cm.yaml
Replace the placeholder with the IAM role ARN we created earlier:
sed -i.bak -e 's|<ARN of instance role (not instance profile)>|ARN-of-the-Role|' aws-auth-cm.yaml
Now, open the file and add eks:kube-proxy-windows to the map roles. Your file should look something like this:
apiVersion: v1
kind: ConfigMap
metadata:
  name: aws-auth
  namespace: kube-system
data:
  mapRoles: |
    - rolearn: arn:aws:iam::111111111111:role/eksClusterRole
      username: system:node:{{EC2PrivateDNSName}}
      groups:
        - system:bootstrappers
        - system:nodes
        - eks:kube-proxy-windows
Apply the ConfigMap with:
kubectl apply -f aws-auth-cm.yaml
Step 3: Configure the VPC Resource Controller
Create a file named vpc-resource-controller-configmap.yaml with the following content:
apiVersion: v1
kind: ConfigMap
metadata:
  name: amazon-vpc-cni
  namespace: kube-system
data:
  enable-windows-ipam: "true"
Apply it:
kubectl apply -f vpc-resource-controller-configmap.yaml
And that’s it! Your cluster is now Windows-ready! 🚀
Managing Your Cluster with K9s 🐶
Before we test the setup, let’s install K9s for better cluster visibility.
K9s is an open-source terminal-based UI for managing Kubernetes clusters interactively.
Installing K9s on Windows
If you’re using Windows, you can install it with Scoop:
scoop install k9s
Once installed, run:

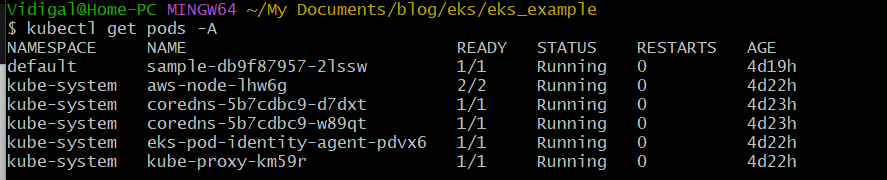
If you don’t see much on the screen, press “0” to display all namespaces.
Take a moment to play around with it before moving on!
Deploying a Sample .NET App
Now, let’s test our setup by deploying a sample Windows-based .NET application.
Step 1: Define Node Selectors
When deploying workloads, we need to specify node selectors in the manifest to ensure pods are scheduled on the correct nodes.
For Windows pods:
nodeSelector:
        kubernetes.io/os: windows
        kubernetes.io/arch: amd64
For Linux pods:
nodeSelector:
        kubernetes.io/os: linux
        kubernetes.io/arch: amd64
Step 2: Deploy the App
Create a Kubernetes manifest (sample_app.yml) with a simple .NET app:
apiVersion: apps/v1
kind: Deployment
metadata:
  labels:
    run: sample
  name: sample
spec:
  replicas: 1
  selector:
    matchLabels:
      run: sample
  template:
    metadata:
      labels:
        run: sample
    spec:
      containers:
      - image: mcr.microsoft.com/dotnet/framework/samples:aspnetapp
        imagePullPolicy: IfNotPresent
        name: sample
      nodeSelector:
        kubernetes.io/os: windows
Deploy it:
kubectl create -f sample_app.yml
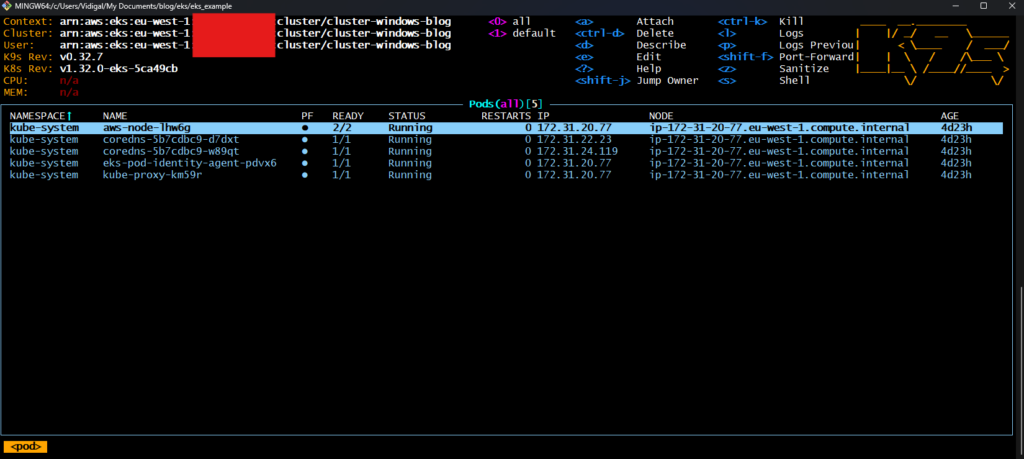
And voilà! 🎉 Check your cluster in K9s, and you’ll see the sample app running on the Windows node.

What’s next?
Congrats! Your EKS cluster is now ready to run Windows applications! 🚀 But why stop there?
If you’re thinking about modernizing your .NET Framework applications to be cross-compatible with Linux systems, consider exploring Amazon Q. It’s a game-changer that helps you assess and transform your existing .NET applications into cloud-native solutions, making it easier to migrate to Linux-based environments. This means lower costs, better performance, and more flexibility for your infrastructure! 🌥️
Curious about how Amazon Q can fit into your modernization journey? Or have questions about setting up Windows nodes in EKS? Drop a comment below! Let’s learn and build together. If there’s anything specific you’d like me to cover in future posts, let me know!
See you in the next post, and happy Kubernetes-ing! 👋

References
https://docs.aws.amazon.com/amazonq/latest/qdeveloper-ug/transform-dotnet-IDE.html
https://docs.aws.amazon.com/eks/latest/userguide/windows-support.html
https://docs.aws.amazon.com/eks/latest/userguide/auth-configmap.html#aws-auth-configmap


Kubernetes is not easy. Thank you for sharing your experience configuring it on AWS. Your growth has been impressive. Let’s go!
Thanks! More K8s posts coming soon!